Sourdough Starter for Beginners
Sourdough. Are you finally ready to try again? A simple sourdough starter guide for beginners. What to expect, what’s normal, and how to get started without the confusion. Follow along to learn everything you actually need to know about starting a sourdough starter.
If you want to skip the whole process of making your own starter and you want to get started baking ASAP, scroll to the bottom of this post. I have a link to buy MY dehydrated sourdough starter here. All you do is jumpstart it when it arrives, feed it every day, and you can be baking in less than a week!

Follow along here where I’ll walk you through the basics you actually need: what a starter should look like, how to feed it, and how to tell when it’s ready to use. We’ll cover the simple rhythms of sourdough so that you’re not constantly second-guessing yourself.
I’ll also talk about common beginner mistakes, what’s normal (and what’s not), and how to troubleshoot without panicking or starting over. Think of this as your starting point — the foundation that makes everything else feel a lot less confusing.
Making this post, I visited a few sourdough groups on Facebook and researched what issues most people face to make sure I can be as beneficial to you as possible. One thing to keep in mind as you embark on the sourdough journey — don’t make it harder than it needs to be… it can sense your fear LOL.
To start your sourdough starter you’ll need:
– 1 jar (any wide-mouth glass or ceramic jar 20oz–33oz with a lid will work to get started, I personally use a ¾ L Weck jar)
– Unbleached flour (King Arthur flour, Kirkland flour, or you can mill your own flour!)
– Water (non-chlorinated, preferably filtered water or mineral water)
– Small silicone spatula
The items above are all you need to get started, but if you really want to get into sourdough, I will have my favorite must-have sourdough products linked at the bottom of this post. There is a snippet of information that is important to know to maintain a starter. Starters are fairly resilient (harder to kill than people think), but rather finicky when it comes to their environment.
Day 1:
Mix ½ cup (65 grams) of flour and ¼ cup water (60 grams) in your jar while scraping down the sides with your silicone spatula. Let the jar sit on your warming plate or on the back of your stove. (Do not trust yourself or members of your family to keep it in the oven — trust me.)
Days 2–8:
Discard HALF of your starter. Mix in ½ cup (65g) flour and ¼ cup (60g) water to your remaining starter. Leave for about 24 hours. Do not keep any discard until you have a usable starter to reap the benefits of fermentation.
Day 9:
Your starter may be ready to use at this point. However, I recommend discarding and feeding for another 3–4 days to ensure it’s strong and established. Sourdough is something that really thrives as the cultures age — waiting is never a bad idea. Timelines vary depending on temperature, flour, and your home environment, so if yours isn’t quite there yet, that’s completely normal.
Days 10–13:
Your starter should be ready to use!! If you’re ready to bake, visit my Easy Sourdough Bread Recipe.
Before You Start: A Few Things That Matter
There is a snippet of information that is important to know to maintain a starter. Starters are fairly resilient (harder to kill than people think), but rather finicky when it comes to their environment.
-Bleached flour can inhibit growth and weaken your starter.
-Chlorinated (tap) water can slow or inhibit growth over time.
-Using too big of a jar can make it harder to track rise and activity and can slow things down.
-Using too small of a jar will cause your starter to overflow.
-Letting unfed starter sit at room temperature for too long can produce mold and/or become overly acidic and kill the yeast. -If you are unable to feed it every day, put it in the refrigerator until the day before you want to make something. More details on this below in the FAQ section.
FAQs
When is my starter really ready to bake with?
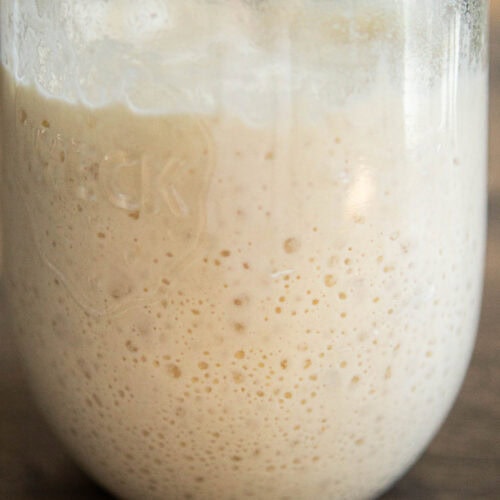
There’s no specific timeline, but generally, around day 14 you can try baking! There are signs to look for that are more accurate in telling if your starter is ready or not: bubbly throughout from bottom to the top, rising about double after feeding in an 8-hour timeframe, and the smell is sweet-sour and not rancid or acetone.
My starter isn’t rising much. Is it dead?
Probably not! If your starter isn’t rising much around day 8–9+ of starting it, keep discarding and feeding it. If the temperature in your house is less than 68 degrees, it’s probably cold. A warming plate or keeping it on the back of your stove when you’re cooking or baking will fix that problem! Make sure you don’t put it in the oven with the light on, as many people suggest… you never know who’s going to forget and preheat the oven.
Why does my starter smell weird?
Starters smell funky before they smell good. Sour, tangy, or even a little unpleasant is normal, especially early on. If it smells truly rotten or has mold, that’s when you discard and start over.
Follow-up question — what signs do I look for indicating if it’s rotten or moldy?
This may sound like a funny question because it seems pretty straightforward — “fuzzy, green, white, black, chunky.” Which, yes, those characteristics point to something rotten or moldy. With sourdough starter, there are characteristics to look for before it gets to that point. When a starter has an orange-ish or pink-ish tinged liquid sitting on top (or the starter itself is orange-ish/pink-ish), that is an indication of mold. The ONLY color that is not something to worry about is a darker gray/brown liquid on top.
What is that yucky-smelling dark brown-ish/gray-ish liquid on my starter?
That is called hooch. It is your starter telling you that it’s hungry. It’s when the flour (food for bacteria and yeast) has been eaten. The yeast starts producing alcohol (hooch). If you like a sour-tasting sourdough, stir it in and feed. If you like a mild-tasting sourdough, pour the hooch out and feed as normal.
What makes discard different than starter?
Nothing. Discard is starter that has not been fed. I love to keep my discard in a large jar in the fridge so that I can manage little amounts at a time.
How do I manage/maintain a starter when I don’t want to make something every day?
Your refrigerator is your best friend in this case. I keep a large jar of sourdough discard in my refrigerator for when I want to make something. I take out 50g of discard and put it in my ¾ L Weck jar and mix in 100g flour and 100g water, cover, and place on the warming plate. It should be ready to use in about 12 hours or so.
What else can I do with discard?
This is what I do: I take 50g of discard from my refrigerator stash, feed it, let it rise, use however much the recipe requires and then “discard” the rest. That can either mean adding it to my stash or making something with it — usually something that doesn’t require much. For example: cheese crackers, pancakes, biscuits, pretty much anything that doesn’t require yeast.
Ingredients
Method
- Day 1: Mix ½ cup (65 grams) of flour and ¼ cup water (60 grams) in your jar while scraping down the sides with your silicone spatula. Let the jar sit on your warming plate or on the back of your stove. (Do not trust yourself or members of your family to keep it in the oven — trust me.)
- Days 2–8: Discard HALF of your starter. Mix in ½ cup (65g) flour and ¼ cup (60g) water to your remaining starter. Leave for about 24 hours. Do not keep any discard until you have a usable starter to reap the benefits of fermentation.
- Day 9: Your starter may be ready to use at this point. However, I recommend discarding and feeding for another 3–4 days to ensure it’s strong and established. Sourdough is something that really thrives as the cultures age — waiting is never a bad idea. Timelines vary depending on temperature, flour, and your home environment, so if yours isn’t quite there yet, that’s completely normal.
- Days 10–13: Your starter should be ready to use!! If you’re ready to bake, visit my Easy Sourdough Bread
Tried this recipe?
Let us know how it was!Tips & Reassurance
-As I mentioned before, do not be scared or overthink things! The more laid-back approach you take, the more enjoyable the process will be. Your starter will only thrive if you enjoy it and don’t view it as another chore. After all, it is a living thing. Giving it a name can help!
-Sourdough is not an exact science. Two people can follow the same steps with the same flour and still get slightly different results – and that doesn’t mean either of you did anything wrong.
-If you miss a feeding, it’s okay. One missed feeding will not ruin your starter. Just feed it when you remember and keep going.
-Your starter does not need to double every single time to be healthy. Rise can vary day to day depending on temperature, timing, and how recently it was fed.
-Clear jars are helpful, but perfection is not required. Rubber bands, dry-erase markers, or even just eyeballing it are all fine ways to track rise.
-If your starter seems sluggish, don’t panic and don’t start over right away. Most issues can be fixed with consistency, warmth, and time.
-You do not need to bake every day to be “good” at sourdough. Using your refrigerator is underrated and one of the most useful tools when it comes to sourdough.
-There is no prize for the most complicated routine. Simple, repeatable rhythms will always outperform perfectionism.
What should/shouldn’t my starter smell like?
SHOULD:
Tangy or sour
This is exactly what you want. It means fermentation is happening and things are moving in the right direction.
Yeasty or bready
A sign of active yeast. This usually shows up once your starter is getting established and doing its thing.
Fruity
Very common with new starters. It just means fermentation has started, even if everything isn’t fully balanced yet.
Sweet-sour
A good mix of yeast and bacteria. You’ll often notice this when your feeding routine is fairly consistent.
Wine-like
Your starter is hungry. It’s used up its food and is ready for a feeding.
Mild vinegar
Totally normal. This usually means it’s gone a little longer between feedings than usual.
SHOULDN’T:
Rotten eggs or sulfur
This means something went wrong. When it smells like this, it’s best to toss it and start fresh.
Garbage or spoiled food
If it smells truly rotten and not just sour, don’t keep it. That’s not a normal fermentation smell.
Moldy or musty
Any mold smell is a deal-breaker, even if you don’t see much yet. Toss it.
Dirty socks or gym bag
A sign of something being out of balance. This can happen with very inconsistent feedings or poor airflow.
Spoiled cheese
A mild cheesy smell can be okay, but if it smells like cheese that’s gone bad, it’s time to toss.
Chemical or acetone
Usually means it’s extremely hungry. Try feeding it and see if the smell improves. If it stays harsh or overwhelming, don’t keep it.
My Dehydrated Sourdough Starter
Buy my dehydrated Phil’dough’mena and learn how to rehydrate it and get to baking in less than a week!
A little backstory on Phil’dough’mena: I kinda “cheated” and purchased a live 100+ year old authentic Italian culture sourdough starter. I felt compelled to purchase this because my great-grandmother was from Italy, she loved to cook (of course), and she would be over 100 years old right now.
I still have my own separate starter, though I am partial to Phil’dough’mena.
You can skip making your own starter and buy Phil’dough’mena HERE
Learn how to care for Phil’dough’mena HERE